
|

|
|
A template is an exact, full size pattern of the granite pieces that you want cut for your kitchen or bath counters. The plastic template is cut to fit the kitchen in pieces that will correspond to the granite counter pieces. All cutouts are located and shown full size. The template is then labeled, clearly showing seams, cutouts, edges, backsplashes, etc. The template must be correct since the granite will be cut directly from your template.
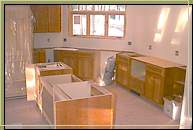
A kitchen ready for templating is shown to the right. The sinks and faucets are on site along with the templates and cooktop.
|
 |
|
MATERIALS

Templates are best made of plastic polypyrene, which you can obtain from a plastic supply house in 4’ x 8’ sheets. These sheets cost about $8 to $12 each. Note that you can only cut an 8' piece from one sheet if your countertops are 25" (cutting 25" from 48" leaves only 23" for the remainder) Be sure to buy enough sheets to have sufficient material on hand. It comes in two thickness': 0.020 costs less and is easier to work with; 0.030 is stiffer. If unable to buy locally, try Manchester Plastic Supply at (800) 752-7759. They will ship and accept credit cards.
|
|
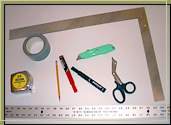
TOOLS
|
You will need the following tools:
- A metal 4’ straight edge (a 2’ could work, but will be more difficult)
- A metal 24" carpenters square
- A utility knife with sharp blades
- A utility scissors (those kind that can cut pennies are good)
- A permanent marker
- A measuring tape
- Duct Tape
- Some ¼" plywood or paneling
|
|
|
PREPARATION
|
All the kitchen cabinets need to be installed. You will need to have on hand at the site any items that will be cut into the counter sinks faucets, sprayers, cooktops, etc.
If this is a retrofit or remodel, you would do best to take out the sink and faucet. Alternatively, you can work around the sink by cutting a hole in the plastic to fit over these obstacles and replace the cutout after fitting.
Bridge holes and gaps with plywood or paneling, such as over the dishwasher opening and sink opening so that you can lay your plastic templates over the top without drooping or sagging.
|
|
|
PROCEDURE
|
1. Cut the mylar into counter depth pieces.
For most standard 24" counter with a 1" overhang, this will mean cutting 25" strips. (Too bad they don't make the mylar in 50" widths instead of 48", because the 25" width leaves a lot of waste with the 23" leftover strip). Some pieces may be thicker or thinner.
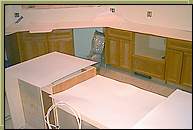
2. Assemble pieces on the cabinets.
Use thin (1/4" plywood or paneling to bridge gaps over dishwasher and sink openings. The picture on the right shows how sheets are overlaid to use one cut for the pattern of the other cut on a seam.
|
|
|
3. Cut each piece to length.
You can leave some gaps in the rear (1/8") to fit the pieces, especially if you are using backsplashes to cover the gap.
4. Locate cut outs:
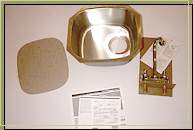
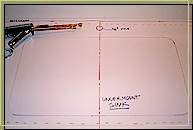
Sinks & Faucets Locate the centerline of each sink by noting the cabinet centerline below the template. Mark the center line. Place the sink template on the granite template and trace around. Note whether the sink is an undermount or top mount. Try to maintain at least 3 ½" of granite on the front, sides, rear and between dual sinks to prevent cracking the granite during shipping and installation. Locate flange with dotted line. Label completely.
Cooktops cooktops generally don't leave enough material for a cutout. You need a minimum of 3 ½" top and bottom. If it is less, then you need to do this with pieces.
|
|
|
5. Label:
Number each template sequentially and circle number. Label each seam with letters on both sides of seam and put cross hatches (label joined). "Seam A / Seam A"
6. Mail to:
Great Granite c/o
Dominion Granite
U.S.A.
Canada
P.O. Box
305
18 Campbell St.
Beebe Plain,
Vt.
Stanstead, QC.
05823
J0B 3E5
|

|
|
Some additional information about
|
Sinks: come in top mount or undermount designs. In either case,
Cutouts: need to have 3 ½" of minimum thickness of granite to be structurally sound. Check this thickness when selecting an undermount sink. If your countertop is 25" wide, then you can have a maximum sink cutout size of 18" front to back.
Faucets: allow sufficient room for faucets and check the size of the bases. If you order backsplashes, these are usually supplied in 1 ¼" material. If you have an 18" sink which leaves 3 ½" granite, subtract the backsplash width of 1 ¼" and you have only 2 ¼" left for your faucet. Most faucets, sprayers, soap dispensers, hot water dispensers use a 1 3/8" hole – but check the instructions and physically measure the fixture for width and check that the base will cover the hole.
Backsplashes are highly recommended since they can cover irregularities and the granite doesn't need to fit tight to the wall. They are provided in matching granite if you request them. They are normally 4" high, but can be cut to any height. If you do not specify, they will be provided at 4".
Seams: are necessary with natural granite. The visibility of your seams will depend on the granite color, pattern and location of the seam. A darker color with a uniform grain will not be very visible, while a lighter color with dramatic grain pattern will be more apparent.
Size: Most colors are available in slabs of 4’ x 8’ (some are larger, up to 5’ x 10’, but call to make sure). You cannot have a piece larger than these. Also, a larger becomes quite heavy to move and install.
Price: Granite is sold by the rectangular dimension. If you want a beveled seam at a corner you will be buying 4 extra square feet for a bevel, since each bevel results in some waste.
|
|